Tree Frog
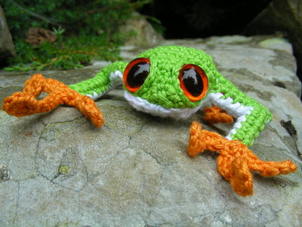
http://littlegreen.typepad.com/romansock/tutorial-tree-frog.html

Tortoise
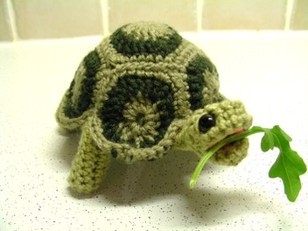
http://littlegreen.typepad.com/romansock/tortoise.html

Pomeranian
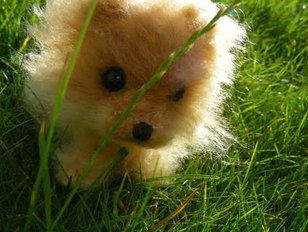
http://littlegreen.typepad.com/romansock/tutorial-pomeranian.html

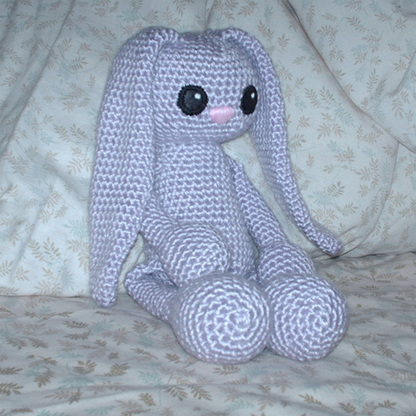
Fluffy bunny
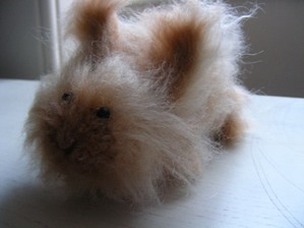
http://littlegreen.typepad.com/romansock/tutorial-fluffy-bunny.html

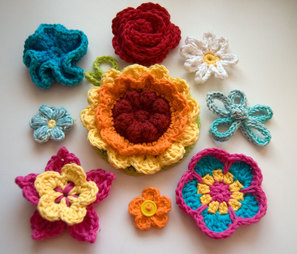
10 beautiful flowers

Cute little bunnies


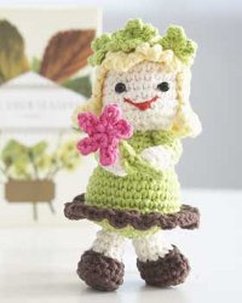
Amigurumi Doll

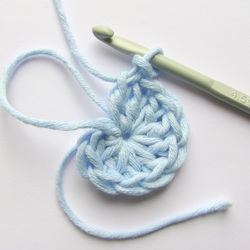
Making A Magic Circle

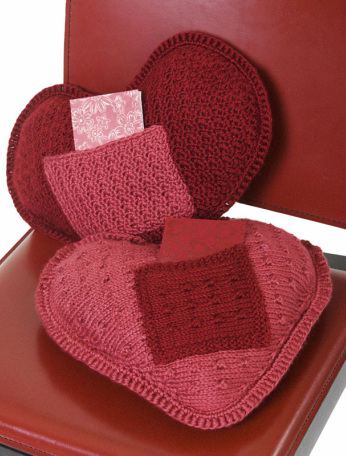
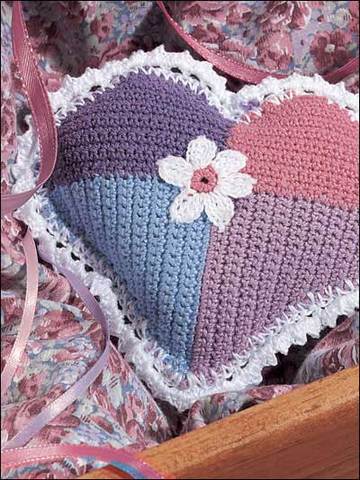
Crocheted hearts and more
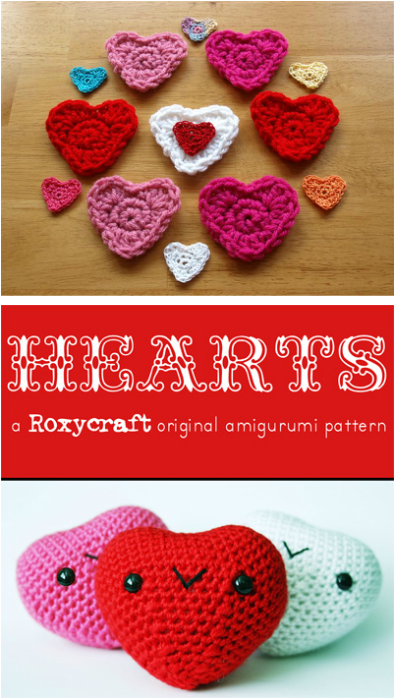
http://planetmfiles.com/2010/02/09/crochet-heart-step-by-step/
http://www.roxycraft.com/crochet_hearts.htm
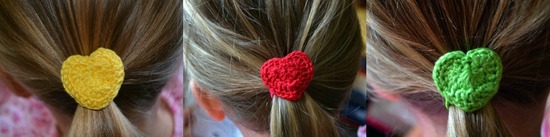
So cute... i am going to make some for my sister and maybe make some for me
http://thegreendragonfly.wordpress.com/2012/02/12/little-hearty-hairties/
http://thegreendragonfly.wordpress.com/2012/02/12/little-hearty-hairties/

Gumball-The-Kitten-Free-Pattern
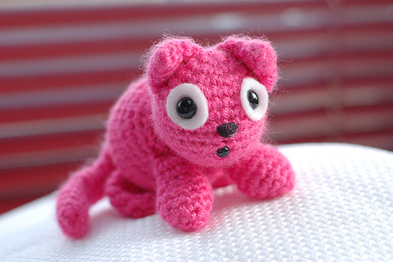
Pattern from http://falwyn.wordpress.com/2008/06/14/worsted-gumball-the-kitten-pattern-v2/
Worsted weight acrylic yarn
E (3.5mm) hook
animal safety eyes (9 mm & felt, 6mm for mouth) and nose, or floss for embroidering features
fiberfill for stuffing
yarn needle
Gauge: tight enough so the stuffing doesn’t show through
Worsted weight acrylic yarn
E (3.5mm) hook
animal safety eyes (9 mm & felt, 6mm for mouth) and nose, or floss for embroidering features
fiberfill for stuffing
yarn needle
Gauge: tight enough so the stuffing doesn’t show through

Lavender Bunny
Items Needed:
300 yards of Worsted Weight Yarn
F hook or hook needed to produce a tight, holeless fabric using your yarn
Felt, embroidery thread, or doll eyes for the face.
Note: It's a good idea to leave a large tail of yarn when fastening off the body pieces. Then you just sew the pieces onto the body using the tail!
Pattern from:
http://www.allcrafts.net/crochetsewingcrafts.htm?url=www.rheatheylia.com/index.php?page=patterns&id=13

Crocheted Rubber Duckie
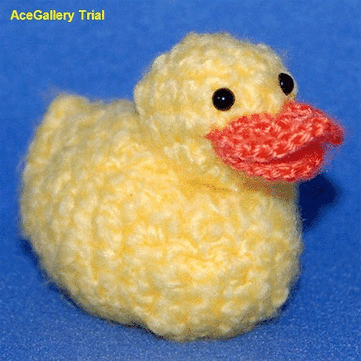
See link for pattern
http://www.allcrafts.net/crochetsewingcrafts.htm?url=www.pixiekitten.com/PixieFree01RubberDuckiePattern.html
http://www.allcrafts.net/crochetsewingcrafts.htm?url=www.pixiekitten.com/PixieFree01RubberDuckiePattern.html

Teddy with Balloons

Pattern from http://yellowpinkandsparkly.blogspot.com/2010/07/buttercup-bear.html
~~~~~~~~~~~~~~~~~~~~~~~~~~~~~~~~~~~~~~~~~~~~~~~~~~~~~~~~~~~~~~~~~~~~~~~
Pattern Note: the bear and the balloon are made in round but it's not compulsory. I used 3.5mm hook and some 8 ply acrylic scrap. You can use any yarn you like best with suitable hook. You can choose any favourite colour to make your bear too.
Head
R1. 6 sc in a magic ring R2. 6 inc R3. (sc, inc)x6 R4. (2sc, inc)x6 R5. (3sc, inc)x6 R6 to R9. sc around R10. (3sc, dec)x6 R11. (2sc, dec)x6 R12. (sc, dec)x6
Finish off and leave long tail for sewing
Muzzle
R1. 6sc in a magic ring R2. 6inc
Finish off and leave long tail
Body
R1. 6 sc in a magic ring R2. 6 inc R3. (sc, inc)x6 R4. (2sc, inc)x6 R5 to R6. sc around Change yarn colour if you want to make your bear looks like he's wearing a shirt R7. sc around R8. (2sc, dec)x6 R9. sc around R10. (sc, dec)x6 R11. sc around
Finish off
Ears (make 2)
R1. 6sc in magic ring R2. 6inc R3. sc around
Finish off and leave long tail for sewing
Hands (make 2)
R1. 6sc R2 to R7. sc around
Finish off and leave long tail
Legs (make 2)
R1. 6sc in magic ring R2. (sc, inc)x3 R3. sc around R4. (sc, dec)x3 R5 to R6. sc around
Finish off and leave long tail
Assembly:
Now that we have all the parts ready, stuff the head and body and sew them together. Then, sew the muzzle, ears, hands and legs together. I did not stuff the hands and i only stuff lightly in the "bigger" part of the legs. Viola! your bear is ready now! It's time to make the balloons.
Balloons (make as many as you like that can fly your bear far far away)
R1. 6sc in a magic ring R2. 6inc R3. (sc, inc)x6 R4. (2sc, inc)x6 R5 to R7. sc around R8. (2sc, dec) R9. sc around R10. (sc, dec)x6 R11. sc around R12. (sc, dec)x4 R13. 4(dec)
Finish off and leave long tail to tie to the bear's hand. Repeat as many as you want your bear to have the balloons. ;)
Now your bear can go up, up and away!
Pattern from http://yellowpinkandsparkly.blogspot.com/2010/07/buttercup-bear.html

Buttercup-The-Teddy-Bear
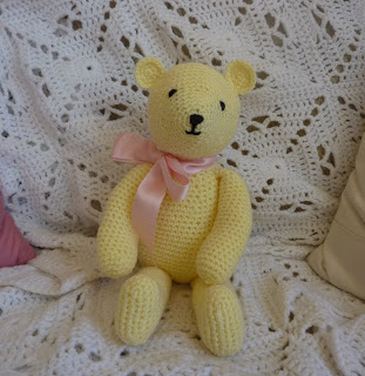
See link for free pattern
http://yellowpinkandsparkly.blogspot.com/2010/07/buttercup-bear.html
http://yellowpinkandsparkly.blogspot.com/2010/07/buttercup-bear.html

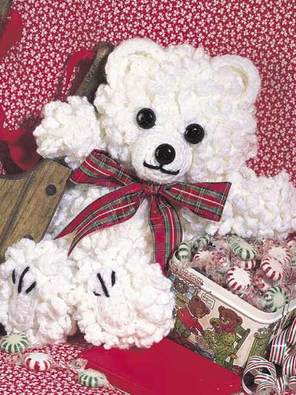
Really Cute Curly Teddy Bear

Crocheted Cupcake
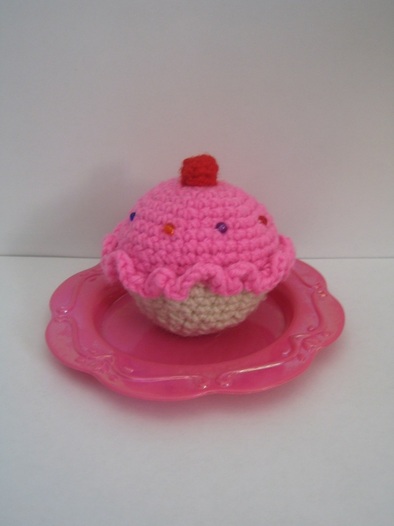
Special Stitch:
Decrease, DEC SC: Draw up a loop in next stitch, again, draw up a loop in the next stitch. [there should now be 3 loops on the hook] Yarn over hook, Draw yarn through all 3 loops on the hook. If you don't get this way to do the DEC st see link, (How to DEC crochet, See Link for step by step pic's http://crochet.about.com/library/bl_decrease.htm)
Top: Make 1
G hook, Pink yarn
Ch2
1: 6sc in second chain from hook
2: 2sc in each st around (12sc)
3: 2sc in first st, 1sc in next st repeat around (18sc)
4: 2sc in first st, 1 sc in next 2stitches, repeat around (24sc)
5: 2sc in first st, 1sc in next 3 stitches, repeat around (30sc)
6: 2sc in first st, 1 sc in next 4 stitches, repeat around (36sc)
7: 1sc in each st around. (36sc)
8: 1sc in each st around (36sc)
9: 1 sc in each st around (36sc)
10: 1sc in each st around (36sc)
11: Working in front loops only, 3sc in each st around (108sc), sl st to beginning sc
Fasten off, weave in ends
Bottom: Make one
G hook, White yarn
1: Join with a sl st to back loop of 'Top cupcake', sc in each st around in back loops only.
2: Sc in each st around
3: Dec sc over first 2 stitches, 1 sc in next 4 stitches, repeat around
4: 1sc in each stitch around
5: Dec sc over first 2stitches, 1 sc in next 3 stitches, repeat around
6: 1sc in each stitch around
7: Dec sc over first 2 stitches, 1sc in next 2 stitches, repeat around
STUFF with poly-fiber fill
8: Dec Sc over first 2 stitches, 1sc in next stitch, repeat around
9: Working in back loops only, sc in each stitch around
10: Dec sc over first 2 stitches, Dec sc until closed
Fasten off, weave in ends
Any problems with the pattern; Email me [email protected]

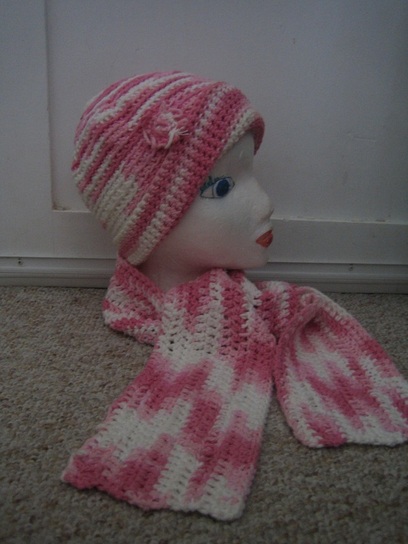
Crocheted Scarf
~~~~~~~~~~~~~~~~~~
Chain: 230
Row 1: double crochet to the end, chain 1 and turn
Repeat row 1 until the scarf is desired length (10 or 20 rows)
Scarf will be 53 inch's long
Chain: 230
Row 1: double crochet to the end, chain 1 and turn
Repeat row 1 until the scarf is desired length (10 or 20 rows)
Scarf will be 53 inch's long
Crocheted hat
Rnd 1: Chain 2, 6 single crochet in 2nd chain from hook.
Rnd 2: Sc in first sc, 2 sc in ea sc around (11 sc)
Rnd 3: *(2 sc in ea sc), rep from * around (22 sc)
Rnd 4: Sc in ea sc around (22 sc)
Rnd 5: *(Sc in next sc, 2 sc in next sc), rep from * around (33 sc)
Rnd 6: Sc in ea sc around (33 sc)
Rnd 7: *(Sc in next 2 sc, 2 sc in next sc), rep from * around (44 sc)
Rnd 8: Sc in ea sc around (44 sc)
Rnd 9: *(Sc in next 3 sc, 2 sc in next sc), rep from * around (55 sc)
Rnd 10: Sc in ea sc around (55 sc)
Rnd 11: *(Sc in next 4 sc, 2 sc in next sc), rep from * around (66 sc)
Rnd 12: Sc in ea sc around (66 sc)
If hat seems big enough at this point, skip to Rnd 16. If not, keep increasing.
Rnd 13: *(Sc in next 5 sc, 2 sc in next sc), rep from * around (77 sc)
Rnd 14: Sc in ea sc around (77 sc)
If hat seems big enough at this point, skip to Rnd 16. If not, increase one more time:
Rnd 15: *(Sc in next 6 sc, 2 sc in next sc), rep from * around (88 sc)
Rnd 16: Sc in ea sc around.
Rep Rnd 16 until hat measures approx. 8" to 9" from beginning. Fasten off and weave in ends.
Any problems with the pattern; Email me [email protected]

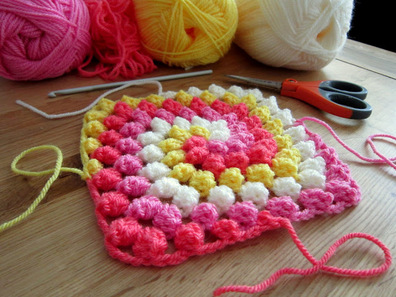
Granny Bobble Spiral
The cutest granny square, it's made from the bobble stitch
http://colourinasimplelife.blogspot.com/2012/06/granny-bobble-spiral.html
The cutest granny square, it's made from the bobble stitch
http://colourinasimplelife.blogspot.com/2012/06/granny-bobble-spiral.html

Sprinkly-donuts
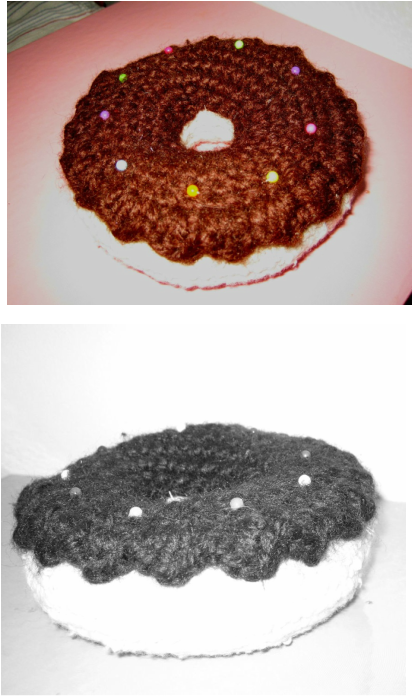
This pattern uses American terminology. The British terms are in [brackets].
- SC [DC] - single crochet [double crochet]
- 2SC [DC] tog - 2 single crochet [double crochet] together (Insert hook into stitch of previous row, draw yarn through. Put hook into the next stitch, draw yarn through. You now have three loops on the hook... yarn over and pull the yarn through all three loops. Picture demo here.)
- HDC [HTR] - half double crochet [half treble]
- DC [TR] - double crochet [treble]
You will be working in rounds, so end every round with one slip stitch into the top of the first stitch in the round. Chain 1, then begin the new round by doing your SC [DC]s into the top of the first stitch of the previous round.
The increase rounds (with 2 SC [DC] in one stitch) and the decrease rounds (with 2SC [DC] tog.) don't have to be exact - the increases/decreases have to be spaced more or less evenly across the round. So don't worry if you've done 2 SC [DC] before an increase and then 3 SC [DC] before the next one - no panic, just a minor blip, no one will notice!
The first round is quite wriggly. Persevere!Begin by chaining 18 stitches.
Rd 1: 1 SC [DC] in each stitch.
Rd 2: 2 SC [DC] in each stitch around.
Rd 3: 1 SC [DC] in each stitch
Rd 4: *2 SC [DC] in first stitch, 1 SC [DC] in next stitch**. Repeat from * to ** all round.
Rd 5: 1 SC [DC] in each stitch
Rd 6: 1 SC [DC] in each stitch
Rd 7: 1 SC [DC] in each stitch
Rd 8: *2 SC [DC] in first stitch, 1 SC [DC] in next four stitches **. Repeat from * to ** all round.
Rd 9: 1 SC [DC] in each stitch
Rd 10: *2 SC [DC] in first stitch, 1 SC [DC] in next five stitches **. Repeat from * to ** all round.
At this point, my donut is like a flat(tish) saucer with a hole in the middle. It measures about 12 cm/4.75 inches across. If yours is bigger, don't worry - you might be using a thicker yarn. You can either rip back a row or keep going to make a bigger donut. (See? My tape measure does imperial and metric!)
Now we're going to decrease:
Rd 11: *2SC [DC]tog, 1 SC [DC] in next five stitches **. Repeat from * to ** all round.
Rd 12: 1 SC [DC] in each stitch
At this point, you might notice your work is starting to curl back in ... that's perfect!
Rd 13: *2SC [DC]tog, 1 SC [DC] in next four stitches **. Repeat from * to ** all round.
Rd 14: 1 SC [DC] in each stitch
Rd 15: *2SC [DC]tog, 1 SC [DC] in next three stitches **. Repeat from * to ** all round.
Rd 16: 1 SC [DC] in each stitch
Rd 17: *2SC [DC]tog, 1 SC [DC] in next two stitches **. Repeat from * to ** all round.
Rd 18: 1 SC [DC] in each stitch
Rd 19: 2SC [DC]tog all round - crochet every two stitches together
It now ought to look something like this:
Now the fun bit starts! Stuff it with as much stuffing as you can manage and sew the the inner edges together as shown. And then stuff some more stuffing in there - they have to be really full.
Frosting:
Begin by chaining 18 stitches.
Rd 1: 1 SC [DC] in each stitch.
Rd 2: 2 SC [DC] in each stitch around.
Rd 3: 1 SC [DC] in each stitch
Rd 4: 1 SC [DC] in each stitch
Rd 5: 1 SC [DC] in each stitch
Rd 6: *2 SC [DC] in first stitch, 1 SC [DC] in next four stitches **. Repeat from * to ** all round.
Rd 7: 1 SC [DC] in each stitch
You should now have a shape similar to the flat donut photo above, but it might curl in a little more. Again, don't worry - this is good. The edge of the frosting is done by making stitches of different heights into each stitch of the previous row - randomly, to look like dripping frosting. For example, I usually do:
1 SC [DC], 1 HDC [HTR], 1 DC [TR], 1 HDC [HTR], 1 SC [DC] - up and down, up and down!
Then sew the inner edge of the frosting to the inside of the donut and whip stitch the edge of the frosting dribbles to the outside.
~ Pattern from http://gingerschatz.blogspot.de/2012/05/tutorial-sprinkly-donuts.html ~

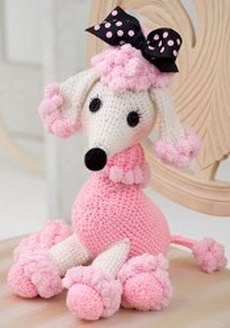
Cute pink poodle
Size: Poodle measures 13” tall x 12” from nose to end (excluding tail).
Materials:
- RED HEART® “Super Saver®”: 1 skein each 373 Petal Pink A, 316 Soft White B, and 312 Black C.
- RED HEART® “Pomp-a-Doodle™”: 1 ball 9785 Cotton Candy Pink D.
- Crochet Hooks: 3.75mm [US F-5], 5mm [US H-8].
- Yarn needle
- stitch marker
- black embroidery floss,
- polyester filler
- strong hand-sewing thread and needle
- buttons* or plastic safety eyes*
- (Optional) ribbon
- (Optional) plastic pellets and knee-high hose for making pellet packet.
* Do not use buttons or safety eyes for children under 2 years of age, embroider eyes instead.
GAUGE: 20 sc = 4”; 16 rounds = 4” in sc. CHECK YOUR GAUGE. Use any size hook to obtain the gauge.
Special Abbreviations:
inc (increase) = 2 sc in next sc.
dec (decrease) = [draw up a loop in next st] twice, yo and
draw through all 3 loops on hook.
Pattern from favecrafts
http://www.favecrafts.com/Crochet-Amigurumi/Pomp-Poodle-from-Red-Heart-Yarn#7pPhHgPJpwIFXzsO.99

Crocheted Harness for a cat, small dog or bunny

For the collar
--------------------------------
Ch 40
Row 1-4: Sc to the end. tie off
--------------------------------------------------
For the 2th part
Ch 9, Sc for 3 rows. Tie off
For the 3th part
-----------------------------
Ch 60
Row 1-5: Sc 5 rows. Tie off
and when you are done put buttons, snaps etc
Any problems with the pattern; Email me [email protected]

Crochet Abbreviations
Meaning
Explanation
st (s)
Stitch or Stitches
The completing of a crochet stitch.
sp (s)
Space or Spaces
When a pattern indicates a space, you will crochet a stitch in the specified space rather than in the next crochet stitch.
lp (s) Loop or Loops
Draw the yarn over the crochet hook and through the stitch to create a loop
ch Chain Stitch
Perform a crochet chain stitch by this simple formula: yarn over and draw loop on crochet hook
sk or sk st Skip or Skip Stitch
This indicates that you are to skip the specified stitch or stitches.
sl kn Slip Knot
All crochet begins with the Slip Knot. Is the knot formed on the crochet hook that starts the foundation chain. First take your piece of yarn and twist it into a pretzel shape. Insert your crochet hook in the center as you draw the end of the yarn through the center.
sl st; ss Slip Stitch
A Slip Stitch is created by drawing the yarn over the crochet hook while simultaneously bringing it through both the loop and stitch at the same time.
Sc Single Crochet
To form a Single Crochet, simply draw up a loop in the the second chain on the crochet hook, bring the yarn over, and draw through both loops on the crochet hook.
dc Double Crochet
To form a Double Crochet bring the yarn over the crochet hook and insert the hook in the next stitch. Bring the yarn over the hook again and draw up a lop (yarn over hook and draw through two loops on hook, twice)
hdc Half Double Crochet
Yarn over hook.
Insert hook in the next stitch to be worked.
Yarn over hook.
Pull yarn through stitch.
Yarn over hook.
Pull yarn through all 3 loops on hook (one half double crochet made)
yo Yarn Over
Yarn Over means to bring the yarn up and over the crochet hook.
Beg Beginning
Indicates the Beginning of the crochet pattern.
Rnd (s) Round or Rounds
To work in a round means to crochet in a circular fashion as opposed to working in straight rows.
